Saturday, February 2, 2013

Heart Healthy Chocolate Muffins

Double Chocolate Muffins

1 cup Heart Smart Bisquick                                              
1/2 cup Hungry Jack Complete Wheat Blends                  
1/2 cup cocoa powder                                                      
1/3 cup sugar                                                                      
2/3 cup skim milk
2 tablespoons Canola Oil
1 large egg
1/2 cup semisweet miniature chocolate chips, plus one tablespoon

Preheat oven to 350. Line 3 mini muffin pans with cupcake liners. Set aside.

In a medium bowl, mix together all ingredients except for the chocolate chips and stir just until moistened. Mix in the 1/2 cup of chips until evenly distributed and reserve the 1 tablespoon for later.
Use a scoop to fill the prepared pans. Sprinkle the tops with the remaining chocolate chips.

Bake at 350 for 10 to 12 minutes until tops spring back when pressed.
Cool in pan on wire rack for about 5 minutes.

Variation: Use 1 and 1/2 cups of Bisquick and omit the cocoa powder for Chocolate Chip Muffins.


Wednesday, December 12, 2012

Pastel Poinsettia Cupcakes


The Edible Artist Network featured my tutorial on making poinsettia cupcakes. You can see it and much more here. Here is another variation to try.
These poinsettia cupcakes have petals cut from gumpaste, but instead of imprinting with a veiner in the traditional way, they are stamped with Christmas sheet music. The petals are made for decoration and can be easily removed from the icing before eating. Follow the easy instructions below to make your own. 


A very small amount of cornstarch is dusted on the rubber stamp to keep it from sticking to the petal. The petals should be allowed to dry slightly before stamping so they can withstand the pressure.


Allow the petals to dry completely before brushing with petal dust. Then, use a handiwipe to brush off the color in between the stamped areas so it will stand out more.


To make the whole petal pink and shiny, brush with lustre dust.


When all of the petals are dusted and dry, pipe a mound of buttercream icing on the center of a cupcake. Three leaves are added first and then a bottom row of five petals. Next add a row of five smaller petals that tilt slightly inward. Finish the flower with 3 more petals and dragees.

Completed poinsettias, one with traditional petals and one with the stamped musical notes. If the flowers are to be used on a cake, the petals can be attached together with piping gel or gum glue and allowed to dry.

Monday, November 26, 2012

Hot Chocolate Bar


It has become a tradition for us to pile in the car, with mugs of hot chocolate napkins full of cookies, and head out to see the holiday lights. The spread has gotten a little more sophisticated over the years but the lights have not changed. We go to Santa's Magical Kingdom and the tackiness has gotten worse if anything. But we still love it, after all it's tradition.


I can not pass up an opportunity to get out my vintage collection of dishes and mugs.

 Candy Cane Cookies


Hot Chocolate Mix- this is the real deal made with nothing but chopped chocolate, milk and cream.


 Chewy Ginger Cookies

 Homemade Marshmallows


Master Hot Chocolate Recipe: Traditional Home Hot Chocolate Master Blend

Friday, November 9, 2012

Paint Party Cake Pops and Cookies


My niece requested cake pops for her paint party so I thought I would attempt paint brush shapes for the first time. I always prefer to use a cookie cutter when I can, for  speed and uniformity. I combined one baked and crumbled cake mix with half of a tub of store made icing in a large bowl. Then pressed it all into a
9 x 13 pan and chilled for about half an hour.
I used a tombstone cookie cutter to cut the cake pop dough. It was a little too big for the job but it was the closest shape I had to a brush bristle.


I did have to reshape the pops to exact size and shape I wanted and then they were chilled again for 15 minutes.


I melted some milk chocolate and dipped the wooden spoons, purchased at Michael's, in the chocolate and pushed about halfway into the pops. Chill again for about 15 minutes.

This package of wooden spoons was $2.99 for 60 at Michael's. I am sure there are other sources available. At the last minute, it was the easiest thing for me to get.

A cell stick or knitting needle works for adding brush lines. The chocolate needs to be just starting to set. (I know these pictures are not in the best order.)
Only a small amount of melting chocolate is needed for the "paint" colors. Microwave in small bowls and dip the chilled cake pops into the color. Use a pastry brush or spoon to put the chocolate where you want it on the cake pop.


The second treat served at the paint party was paint palette cookies. I used a little brown food coloring in the sugar cookie dough to achieve the wood tone. I rolled a texture mat with a wood grain pattern on top before putting the cookies in the oven.

A glace icing was used to get the splattered paint look.

The cookies and cake pops were fun to make. Let me know if you give them a try.


Wednesday, October 24, 2012

Day of the Dead Dessert Table

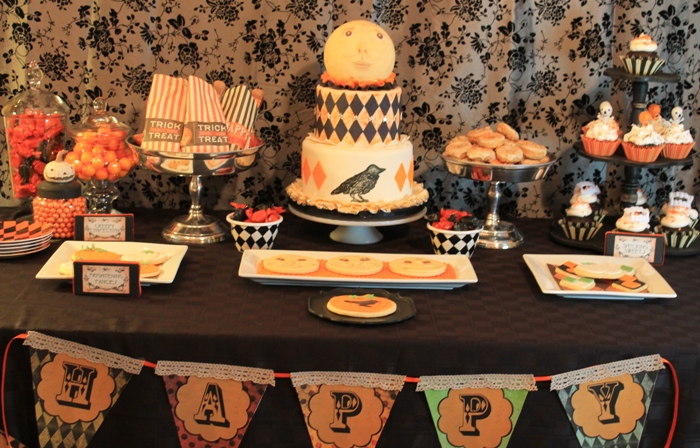
The whole dessert table decorated in bright colors.
Spicy Chocolate Cupcakes
3 ounces bittersweet chocolate morsels           ½ teaspoon salt
¼ cup 100% cacao cocoa powder        ½ cup (1 stick) unsalted butter
1 cup boiling water                 1 cup packed dark brown sugar
2 cups all purpose flour                            2 large eggs
1 teaspoon baking soda                        1 teaspoon vanilla extract
1 teaspoon ground cinnamon               Pinch of cayenne pepper
Preheat oven to 350 degrees. Line muffin pans with paper liners; set aside.
In a small metal bowl, combine bittersweet chocolate, cocoa powder, and boiling water; stir until chocolate is melted and mixture is smooth. Let cool.
In a medium bowl, whisk together flour, baking soda, cinnamon, cayenne pepper  and salt; set aside.
Using the large bowl of a stand mixer, beat butter until creamy, Add brown sugar and beat until light and fluffy, about 2 minutes. Scrape down sides of bowl. Add eggs, one at a time, beating well after each addition. Stir in vanilla, with mixer at low speed, alternately add flour mixture and chocolate mixture, beginning and ending with flour; mix well. Use batter scoop to fill prepared muffin cups about two-thirds full.
Bake in 350 oven for 15 to 18 minutes for regular cupcakes and 11 - 13 minutes for mini or until center springs back when pressed. Cool on wire rack. Makes 12 regular and 24 mini cupcakes. Let cool and frost with icing of your choice.


Sugar molded cupcake pedestal.

Halloween bark in party cups

Bark is made in a jelly roll pan and broken into pieces. Melt 1 pound of chocolate and top with coarsely chopped candy of your choice. Chill for an hour. I used pretzels, candy corn M&Ms and mini Reese's peanut butter cups, 1/2 cup of each. The top was drizzled with about 3 ounces of yellow candy coating melted in a disposable pastry bag.

Fun paper hat crafts made from the printable set.

Coffin cookies wood grain texture mat applied to fondant.


Chocolate skull pops made from a mold.

Mini sugar skulls

Coffin favor boxes filled with chocolate covered pretzels.
Who doesn't want a coffin party favor?


Silicone molds provided by decoratethecake.com
Also featured on Catch My Party

Tuesday, October 9, 2012

Halloween Night Dessert Table

 This Halloween Dessert Table has a vintage feel with the dark backdrop and the Man in
the Moon cake as a centerpiece. The movie Hugo showcased the black and white French film "Voyage to The Moon." It is known as the first science fiction film ever made. The iconic scene of the moon in that film really stuck with me and it was the inspiration for this cake. I vividly remember trick or treating under the light of the moon with nothing but the sounds of the night and the distant shouts of other children. It is a tradition that seems to be slowly fading away. I tried to capture the feel of those dark fall nights here.
 Plastic pumpkins adorn the chocolate cupcakes with
marshmallow frosting.
 Spice donuts with vanilla bean frosting are sweet but a welcome alternative to candy.

 The fondant face is hand sculpted with details painted and dusted. While fondant is still fresh, it can be molded if you work quickly.

 I found the vintage sign holders on etsy.
 The mini artist canvases are from Michael's. They make a good base for the candy labels.

 I remember when trick or treating meant a bag of candy, not just one little piece!
 These cookies were fun to make they stand out against the orange pearls.
 I stamped the crow and cut around it with a sharp knife.


 The cameos are made from silicone molds. Putting them in the freezer for about 5 minutes makes for easier release and ensures the details come through.
A simply sprinkled cupcake is always good to add to the mix.

 I have a mix of plastic and fondant fangs on the cupcakes. These are fondant. Some to eat and some to play with!
I love these vintage picks. I am glad they are making them again.

Vendor Credits
Halloween Banner    ButtonsandBells Etsy Shop
Candy Labels     Chocolate Rabbit Etsy Shop

Disclaimer:  Silicone Molds provided by Decorate The Cake
http://decoratethecake.com/store/Default.asp